Are you planning to shift your experience from Windows to Mac but worried about your data and files? Well, now you’re here there is no need to worry. We have already seen how to migrate from Mac to Windows. Now migrating form Windows to Mac is also quite simple as shifting your data and files from a Windows computer system to a Mac computer system is a very easy process.
Read: Apple releases OS X 10.8 Mountain Lion Developer Preview 3.
 You can run and open your files on Mac if you have the right software installed. What I mean by this?
Almost every Windows application has a Mac version of it and if not, there are other equivalent or similar applications that do the same job.
For example, all your Word and PowerPoint files that you create on your Windows machine will open on Mac if you have ‘Microsoft Office for Mac’ installed. Similarly all your Photoshop files can be opened on Mac if you have the ‘Mac version of Photoshop’.
Read: Review and Giveaway of CleanGenius [15 Licenses worth $29.95 each]
Ways to Migrate from Windows to Mac
- Using External or Removable Media
- Using Direct Connection
- Using Network Connection
- Using Shared File Server
- Using Migration Assistant
- Using Move2Mac
1. Using External or Removable Media
This is the simplest method. All you have to do is copy your data and files onto an external hard drive, USB flash drive or burn it on DVDs. When done, simply insert the removable media into your Mac machine and transfer the data.
Read: Avira releases free antivirus software for Mac.
2. Using Direct Connection
In this method, you directly connect your Windows and Mac machine with the help of an Ethernet cable. Hence, both the machines should have an Ethernet port. Check them and when found follow the steps mentioned below:
1. Connect your Windows and Mac machine with the Ethernet cable.
2. Make sure that both machines are turned on.
3. Open Finder, choose ‘Go’ from the top menu and then choose ‘Connect to Server’.
4. Now, type your PC’s network address in the ‘Server Address’ textbox. For that use one of the following formats:
smb://DNSname/ShareName
smb://IPaddress/ShareName
5. Now click on ‘Connect’.
6. Follow the onscreen instructions and fill in the required details like your PC’s workgroup name, username, password etc. and also the ‘Volume or Folder’ that you want to access.
7. Your PC Volume will appear on your Mac Desktop.
8. Open the volume and copy the files that you want and paste it.
9. Once done, simply unmount your PC volume.
3. Using Network Connection
To use this method, your PC and MAC should be on the same network.
If they are, follow these steps:
1. Switch-on both computers and connect them to Internet.
2. Open Finder, choose ‘Go’ from the top menu and then choose ‘Connect to Server’.
3. Now you have to type your PC’s network address in the ‘Server Address’ textbox. For that use the following format:
smb://ServerName/ShareName
4. Now click on ‘Connect’.
5. Follow the onscreen instructions and fill in the required details like your PC’s workgroup name, username, password etc. and also the ‘Volume or Folder’ that you want to access.
6. Your PC Volume will appear on your Mac Desktop.
7. Open the volume and copy the files that you want and paste it accordingly.
8. Once done, simply unmount your PC volume.
Read:Download TeamViewer 7 for Mac OS X
4. Using Shared File Server
In this method, you can use a ‘Shared File Server’ in order to transfer data and files. Simply upload your data and files to the Shared File Server from your Windows machine and download it from your Mac machine.
If your files are less in number and small in size you can even zip them and mail them to yourself from your Windows machine and download them from your Mac machine.
Read: Review and Giveaway of EaseUS Mac Data Recovery Wizard 5.5.1
5. Migrate from Windows to Mac using Migration Assistant
Migration Assistant helps you easily transfer your file from your PC or Mac to another Mac. You can transfer your user accounts including all of your pictures, music, and files.
When you log-in to your new account, the one to which the files are transferred, you will find that all your information is already organized and placed where it should be. For example, the Wallpaper for your new account will be the same that you had on your Windows machine and your email accounts and all its details will be set up in Mail etc.
So to move files using Migration Assistant to your Mac from your PC on the same network, follow these steps:
1. Make sure both computers are turned on and connected to the network.
2. Open Migration Assistant on your PC. If you don’t have Windows Migration Assistant on your PC, you can download if from the Apple website and install it.
3. Click on Continue.
4. On your Mac, open Migration Assistant. You will find it in this location: Applications/Utilities/
5. Now you will be asked how to transfer your information.  6. Choose ‘From another Mac, PC, Time Machine backup, or other disk’.
7. Click on Continue.
8. When prompted, enter your ‘Username’ and ‘Password’.
9. Select ‘From another Mac or PC’ and click on Continue.
10. If you are prompted to ‘Quit other applications’ that are running on your Mac, click Continue to quit all of them.
11. Now select your PC and wait for it to show the passcode displayed on your Mac.
12. If younotice that the displayed password is correct click on Continue.
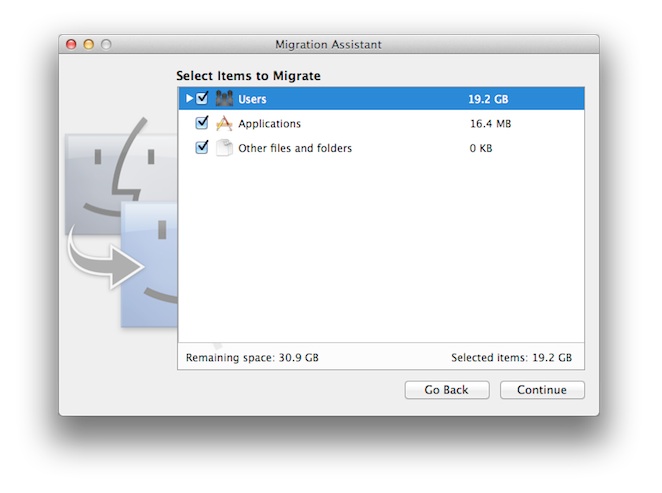
13. Select the information that you want to transfer to your Mac and then again click on Continue.
6. Using Move2Mac
In this method you can use a third party software called ‘Move2Mac’ which will do the job for you.
Along with the regular files and data, Move2Mac also transfers other items such as your email account settings and address book, Internet Explorer bookmarks, desktop backgrounds, dial-up Internet settings, and more.
Please share if you know about any other easy way to migrate from Windows to Mac!