Your Startup Disk is Full is one of the most common messages every Macbook user must have seen; unless you are actually holding a huge storage. My MacBook Air is just 128GB, and it has become a routine to Free up Disk Space on MacBook every week.
Free up Disk Space on Macbook
This post will show you how to manage storage & quickly free up disk space on your Macbook. Find out what’s taking up space on your Mac.
Just before we start talking about how to free up storage space on it, let’s have a basic understanding of the message. The Startup Disk is the primary storage of any MacBook. It will store the OS files, user files, and everything right there. Even when you have multiple storage options available, there is only one Startup Disk where most of the things are stored. The rest of them are used for files.
The message starts appearing when 85% of the disk is occupied, and to make sure it runs smoothly, you should clear whatever is not required. Here are multiple ways to clean up the startup disk on MacBook.
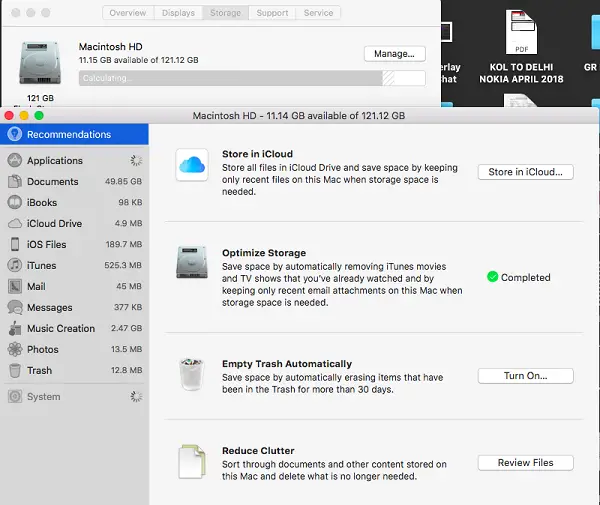
Manage Storage using the inbuilt function
- Click the Apple Icon in the menu at the top-left corner of your screen.
- Choose “About This Mac.” and then click Storage.
- This will display how much space is occupied, with a Manage button. You might want to give it a minute to calculate everything.
- Click on Manage, and it will show you what is occupying the space with details for every app, system apps, etc installed on it.

The inbuilt system offers an upfront solution to clear trash, reduce clutter by finding files which you no longer need, optimize storage, list of applications you want to uninstall and so on. Documents tab is one more section I always look at which instantly lists down all the big files when sorted by size.
You can also uninstall apps you don’t need, delete the files which are no more of importance to you.
OmniDiskSweeper
OmniDiskSweeper is one of the free tools you can use to free up disk space on your MacBook, and it helps to figure out those very large files and can dig into each folder on your Mac to reveal it. it will reveal the files in descending order by size and letting you decide what to do with them.
In a recent update, this app now offers Trash which makes sure if you had deleted a file accidentally, you can recover it. To double check, you can click on the icon of the file at the bottom left to reveal its folder location, and double check before deleting it.

Files can be permanently deleted from the Trash folder. Be warned that post this, there is no way to recover files.
Apart from this here is the list of features the app offers:
- Errors: If a file cannot be destroyed, the trash button is disabled, and it will warn you. Chances are those files are locked by some other applications.
- Folder Drop: To check the size of any folder, you can drag and drop it on the app, and it will reveal the total size.
You can download OmniDiskSweeper from here.
While there are many tools available which you can use, they work almost on the same lines. So in my opinion, these two tips will help you find and remove unnecessary files on your MacBook, and free storage space for other things.
Which Apps do you use to find these types of files? Let us know in the comments.