Vivo NEX and other Vivo smartphones come with an extra button on the side that is allotted to Google Assistant and Jovi Assistant by Vivo. There is currently no option available to change the button settings or remapping options. So, if you do not want to use the Google Assistant or Jovi by tapping on the button, it entirely becomes an extra piece of a button with literally no use. Do not worry. We have a great solution that helps you remap the Jovi Assistant button in Vivo NEX.
If you have come across many apps that ask for root permission, you do not need to go for them. Here is a straightforward solution that will help you to know how to remap the Jovi button in Vivo NEX.
Vivo NEX & Jovi Button
Chinese smartphone manufacturer Vivo launched its true flagship smartphone Vivo NEX several weeks ago. One of the significant highlights is the motorized front camera that pops up when the front camera app is triggered. So, the camera is always hidden (other sensors as well). It has an under-screen fingerprint scanner that makes it more innovative. Apart from other standard hardware specifications, the company implemented an extra physical button on the smartphone named “Jovi Button” that you can use to turn on the personal assistants.
By default, the button lets you open Google Lens in short click while the long-press triggers Google Assistant. Even though the company markets it as the Jovi Button, there is still no Jovi Assistant added to the smartphones. However, it also not possible to remap the buttons too. The following methods described below will get you the button remapping, which you could not find from smartphone settings.
How to remap Jovi Assistant button in Vivo NEX
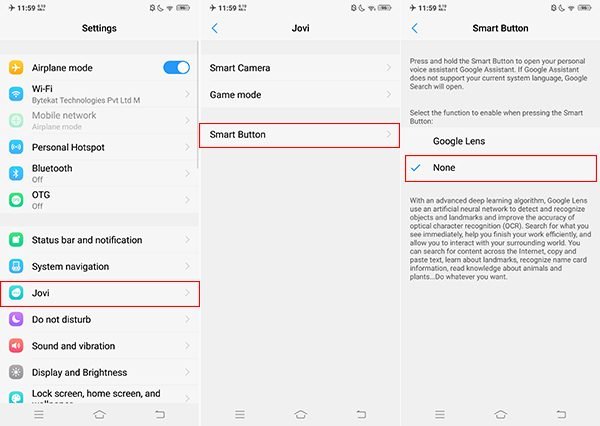
In case you need to know more about the Jovi Button in NEX, you can navigate to settings > Jovi > smart button. There you could see two options: Google Lens and None. So, you do not have any other choice that lets you remap the button. So far, we do not have any inbuilt function or option that might allow you to set any other purpose to the button. Therefore, it is necessary to use some third-party apps.

We prefer Buttons Remapper (No Root) app to remap the button in your Vivo NEX. After installing the app, follow the below steps to remove Jovi smart scene icon
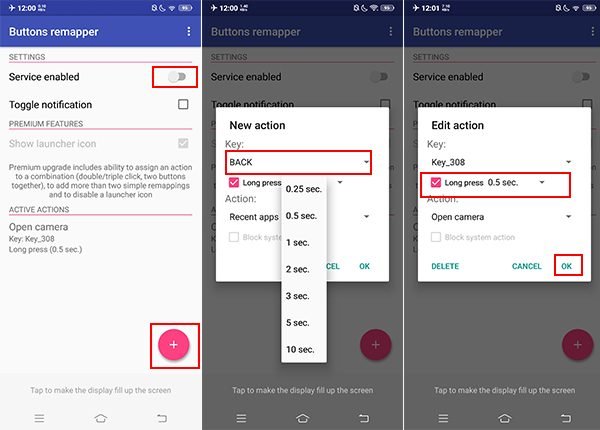
Step 1: Open the Buttons Remapper app on your smartphone. Tap on Service Enabled and toggle on. You will be redirected to Accessibility settings where you have to grant app permissions.
Step 2: Go to Settings > Jovi > Smart Button > None. Come back to the app and tap on the “+” button at the bottom. Tap on “Short and long press.” Select “Other “ from the drop-down menu below the Key section.
Step 3: Tap on the physical button for Jovi on your smartphone. You will be again redirected back to the app’s previous screen, and you could see the button identified as Key_308. Mark the Checkbox near to “Long press” and choose seconds and Press& hold delay. Below the “Action” section, select an action that you need to remap to the button.

As the Google Assistant for long press is the default and not be able to disable, you cannot set any extended press settings for the button.
How to uninstall Jovi Voice Assistant?
It is possible to uninstall Jovi Voice Assistant using adb shell from any Vivo Phone which has this dedicated button.
First setup ADB, and then execute the command pm uninstall -k –user 0 com.vivo.agent. You can do it from macOS or Windows 10 PC.
We expect the article helped you to remap the Jovi Assistant button in Vivo NEX smartphone.


3 Comments