There might be many situations where a screenshot won’t do the job and you need to record your phone’s screen. Google has introduced an official method to record your Android phone’s screen.
Earlier, the only way to get your screen recorded was by granting superuser rights after rooting the phone and using apps that offer the functionality. In Android 4.4 Google lets you do it the native way without the need of rooting your phone.
All phones and tablets running Android 4.4 have the ability to record and save screen recordings. To do it first you need to get ADB working and then with simple commands you perform the recording.
How to set up Android Debug Bridge (ADB) on your computer
Step One: Download Android SDK from Android SDK site and extract it to your C drive.
Step Two: Open the SDKManager.exe and install the default packages.
Step Three: Install the necessary drivers. You’ll need either Google USB drivers for Nexus device or OEM specific drivers for other devices.
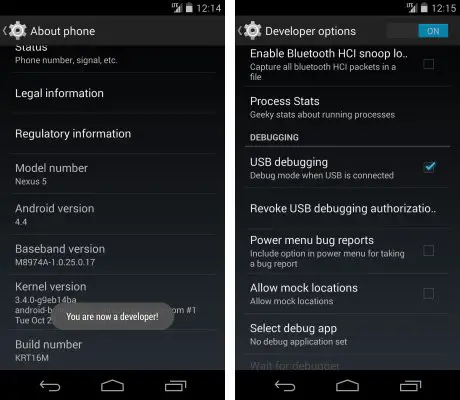
Step Four: Enable USB debugging from your phone. To do it navigate to Settings > Developer Options. If Developer Options is hidden by default, you’ll need to go to Settings > About Phone and tap seven times on the Build Number entry to unlock Developer Options.

Step Five: Connect your phone to your computer using the cable provided.
Step Six: Go to command prompt and enter the following command,
cd C:\adt-bundle-windows-x86_64-20131030\adt-bundle-windows-x86_64-20131030\sdk\platform-tools
Step Seven: Enter “adb devices” command and hit enter. If you see the devices connected then you’ve successfully installed ADB.
Having ADB is prerequisite to perform screen recording. Once you have ADB up and running, follow the following steps to use native screen recording feature.
How to use native screen recording feature in Android 4.4
Step One: Open Command Prompt and navigate to the folder that contains adb file,
cd C:\adt-bundle-windows-x86_64-20131030\adt-bundle-windows-x86_64-20131030\sdk\platform-tools
Step Two: Type “adb devices” to check whether your device is recognized. If it is displayed, you are ready to start recording.
Step Three: Type “adb shell screenrecord /sdcard/movie.mp4” and press Enter.
Note: As soon as your hit Enter the recording will start.
Step Four (Optional): You can use bitrate attribute to set higher and lower quality video. Do it by typing “adb shell screenrecord /sdcard/movie.mp4 –bit-rate 8000000” this will make a crispy 8Mbps video.
This native way is not easy, but still preferable over rooting the phone. If you have already installed ADB you can directly continue with the screen recording method. With this it’s easy to make keep YouTube channel flooded with videos.


