While the option to take a screenshot and recoding video of your screen was available with macOS from some time, starting with macOS Mojave, Apple has revamped the interface and added new features to both of these. In this guide, we will share How to take a Screenshot and Record Screen in macOS Mojave.
How to take a Screenshot and Record Screen in macOS Mojave
- How to take a screenshot on macOS Mojave
- Capture Entire Screen, Selected Windows or Selected Portion
- Choose a save location for the screenshot
- Edit a screenshot
- Hide or Show the mouse pointer in screenshots
- Set a timer for screenshots
- How to Record Screen in macOS Mojave
- Capture Entire Screen, Selected Windows or Selected Portion
- Choose a save location for the recorded videos
- Edit a screen recording
- Set a timer for screen recording
Note: The screenshot tool and the record screen tool is merged in macOS Mojave
How to take a screenshot on macOS Mojave
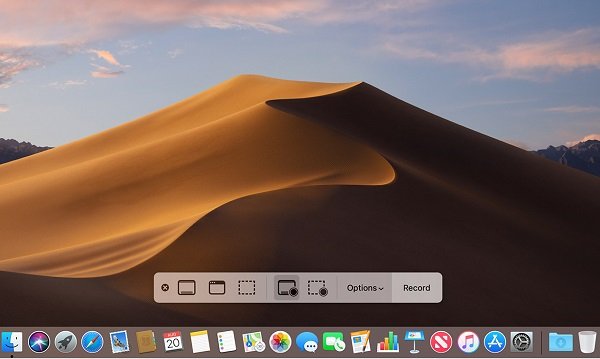
While Command + Shift + 3 (full-screen screenshot), and Command + Shift + 4(selective screenshot) had been used till now, when you hit Command + Shift + 5, you get a new screenshot toolbar.
You have three small windows right next to each other. First one captures an entire screenshot, while second captures selected window. The last one captures a selected portion. The selection box can be adjusted in size and moved around to capture the desired area.
How to choose a save location for screenshots on macOS Mojave
Every time a screenshot is taken, it stays for a while at the bottom-right corner. You can drag and drop it to any app on your macOS or tap on it to open it in the preview.
You can also right-click on the screen and choose to save to Desktop, Documents or save it to the clipboard. Other options in the context menu, i.e., when you right click on the screenshot, include open in the mail, messages, preview, photos, delete, use markup tool, show in finder, and delete.
To change the save location of screenshots permanently
Launch the screenshot toolbar, and then click on the Options flyout menu. Here you can change the save location. The save location options include Desktop, Document, Clipboard, Mai, etc. The last option is to save in a predefined folder.
Hide or Show the mouse pointer in screenshots on macOS Mojave
If you want to show the mouse pointer in your screenshot, then it can be enabled from the toolbar. Press Command + Shift + 5 > Options > Select Show Mouse pointer. Unselect to hide it.
Set a timer for screenshots on macOS Mojave
Sometimes you need to perform a set of steps to reach the point where the screenshot should be taken. It has to be automatic, and this is where the timer comes in the picture.
Press Command + Shift + 5 > Options > Select timer as 5 seconds or 10 seconds. The best part is you can set this as default if you use it often.
How to Edit a Screenshot on macOS Mojave
There are two ways to edit a screenshot. First, launch the screenshot in Preview or Markup mode when it appears on bottom-right using the context menu. Second, you can open it from the saved location in preview mode, and then edit using the available tools.
How to record your screen on macOS Mojave
Now that we know that the toolbar we used for taking a screenshot can also be used to record screen. Press Command + Shift + 5 on your keyboard to bring up the recording toolbar.
Then select either the window with a small circle at the corner to Record Entire Screen or Record Selected Portion uses the dotted with a loop at the bottom corner.
Post selection hit the record button to begin recording. Once you are complete, press the Stop button in the Menu bar to stop the recording.
Note: If you wish to use a microphone while screen recording, enable that from the Options menu of the toolbar.
How to choose a save location for screen recordings on macOS Mojave
Similar to the screenshot, once you finish the recording, you can right-click on the floating window on bottom-right and right-click to choose a location.
To set a default location for recording, re-launch the recording tool, and select for options. The default location for saving screenshot and recording will always be the same unless you specifically choose to save it somewhere else.
How to set a timer for screen recordings on macOS Mojave
Press Command + Shift + 5 on your keyboard to bring up the screenshot toolbar > Options > Select None, 5 Seconds, or 10 Seconds under Timer to set a timer.
How to edit a screen recording in macOS Mojave
You can instantly start editing the screen recording by clicking on it to open in the Markup tool. The tool lets you trim the video by selecting the endpoints of either side. Adjust their positions, and then save it. You can also choose to delete and share the recording from there.
That said, Apple has done an excellent job combining both of these tools. What do you think of it? Is it easy to take a Screenshot and Record Screen in macOS Mojave?
